
Hey folks, as requested by Wade, this is a detailed tutorial in addition to the original TagExploré tutorial article.
In this article, I’ll demonstrate how this feature works with a real example. Yep, just like a case study.
Hope it’ll help, comments are welcomed. 😉
In short, TagExploré is a feature that generates visual hierarchical structure of your tags. So it really enhances the way you use tags. But let me show you how it works with a real example.
Let’s say I’m running an computer store that sells computer gadgets, and I need to make a list of all different kinds of gadgets I’m selling.
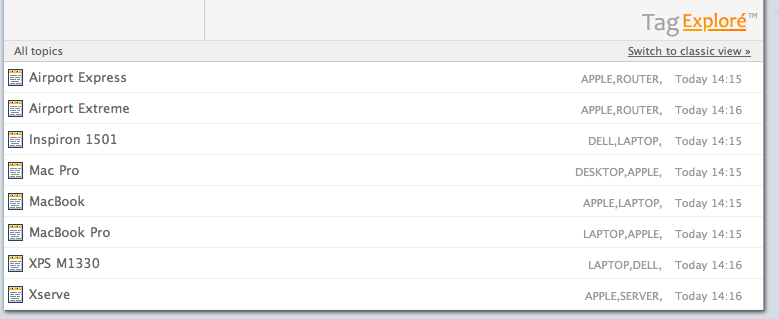
As you can see from the image, I’ve created topics for all my products, with proper tags.
I use multiple tags as keywords for my topics.
For example, MacBook Pro is an Apple product, so it has a tag called “Apple”; besides, it is a laptop, so it has a tag called “laptop” as well.
Here is where the fun begins.
By tagging my topics like that, TagExploré generates a browser like this image below.
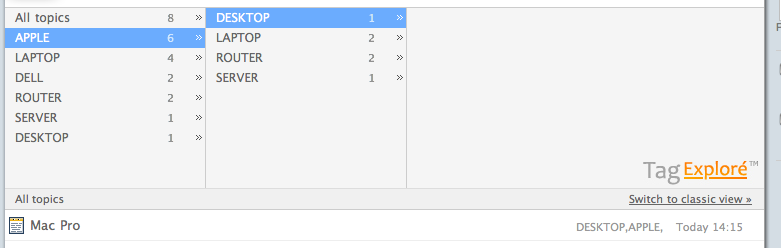
With this browser, I can browse my inventory like never before: see all my computer products? Or see all the apple products? Not a problem. What’s even better is that you can browse all the “desktop” computers produced by Apple, as indicated in the image above.
All the matched topics are automatically listed below as you navigate.
In this example, I was only using 2 tags for topics. However in real life you’ll assign even more tags for topics. The more tags you’re using, the more possibilities you get to explore your contents.
The most fun part about this feature is that you get unlimited hierarchical structures of your contents without having to maintain such structure.
So, in short, several most obvious advantages of TagExploré compared to using folders (and any tree-alike classification):
1. You get unlimited ways / unlimited depth to browse your content;
2. Single topic can belong to different categories at the same time without duplicating;
3. Spend no time in organizing and re-organizing such structures — it’s generated automatically based on your tags.
Just imagine the pain that some day you need to re-organize your piles of folder. 🙂
This is just an demonstration of how Pagico can be used to categorize your content. Actually there are millions of ways to use Pagico, as it is designed to be a true free-form environment.
The only form is yourself.
Comments are welcomed!
Update x1
Some users asked me “what if I’ve got tons of tags, are they all will be listed in this browser?”. Well, here’s the fun part (again). Pagico will automatically re-order your tags so that the most possible tags you’re going to pick are displayed first. And that’s why Pagico sometimes doesn’t display your tags in alphabetical order.
Update x2
Okay, what if you just want to turn Pagico into your “personal blog” in which you just want to use the most basic feature of tags? You can do it as well. Just click on the “Switch to classic mode” in the TagExploré browser and you’ll find yourself at home. 🙂